
🌱 Spec Kit ZH
更快地构建高质量软件。
一个开源工具包,让你专注于产品场景与可预期的结果,而不是从零开始凭感觉拼凑每一个实现细节。



目录
- 🤔 什么是规范驱动开发?
- ⚡ 快速开始
- 📽️ 视频概览
- 🚶 社区演练项目
- 🤖 支持的 AI 代理
- 🔧 specify-zh 命令参考
- 📚 核心理念
- 🌟 开发阶段
- 🎯 实验目标
- 🔧 前置要求
- 📖 延伸阅读
- 📋 详细流程
- 🔍 故障排除
- 💬 支持
- 🙏 致谢
- ⭐ Star History
- 📄 许可证
🤔 什么是规范驱动开发?
规范驱动开发(Spec-Driven Development)重新定义了软件开发的起点。过去几十年里,代码一直是开发过程中的主角,而规范常常只是编码开始前临时搭起来的脚手架。规范驱动开发改变了这一点:规范本身变得可执行,它不再只是指导实现,而是可以直接驱动计划、任务拆解与最终实现。
⚡ 快速开始
如果你希望先快速跑通一遍从需求到实现的完整流程,这一节可以帮助你在几分钟内建立起最小可用认知。
⏱️ 3 分钟上手
第 1 步:安装
uv tool install specify-cli-zh --from git+https://github.com/loulanyue/spec-kit-zh.git
[!IMPORTANT] 📦 安装包名:
specify-cli-zh(用于 pip / uv install 下载)
🚀 执行命令:specify-zh(用于在终端执行工具)
第 2 步:初始化项目
specify-zh init my-project
第 3 步:验证
specify-zh check
🤷♂️ 我应该用哪个命令? (FAQ)
specify-cli-zh:这是本中文分支在 Python 包管理系统中的分发包名。但在运行工具本身时,请不要输入specify-cli-zh。specify-zh:这是您真正在终端执行的命令名。所有的命令前缀都应为specify-zh以避免冲突。specify:这是上游英文原版的默认命令名。如果你只安装了本工具,并且环境中没有安装过冲突工具,你可以为其配置 alias,但在本项目文档和教程中,我们将始终称之为specify-zh。
📌 安装方式速览
| 场景 | 推荐命令 |
|---|---|
| 长期使用、希望全局可调用 | uv tool install specify-cli-zh --from git+https://github.com/loulanyue/spec-kit-zh.git |
| 临时试用、不想安装到本机 | uvx --from git+https://github.com/loulanyue/spec-kit-zh.git specify-zh |
1. 安装 specify-cli-zh
请选择你偏好的安装方式:
方式 1:持久化安装(推荐)
安装一次,全局可用:
uv tool install specify-cli-zh --from git+https://github.com/loulanyue/spec-kit-zh.git
安装完成后即可直接使用:
# 创建新项目
specify-zh init <PROJECT_NAME>

# 或在现有项目中初始化
specify-zh init . --ai claude
# 或者
specify-zh init --here --ai claude

# 检查本机工具环境
specify-zh check
specify-cli-zh 默认安装的命令名是 specify-zh,这样可以避免与其他已安装的 specify 命令冲突。
升级 Specify 请参阅 升级指南。快速升级命令如下:
uv tool install specify-cli-zh --force --from git+https://github.com/loulanyue/spec-kit-zh.git
方式 2:一次性使用
无需安装,直接运行:
# 创建新项目
uvx --from git+https://github.com/loulanyue/spec-kit-zh.git specify-zh init <PROJECT_NAME>

# 或在现有项目中初始化
uvx --from git+https://github.com/loulanyue/spec-kit-zh.git specify-zh init . --ai claude
# 或者
uvx --from git+https://github.com/loulanyue/spec-kit-zh.git specify-zh init --here --ai claude
持久化安装的优势:
- 工具会保留在 PATH 中,随时可用
- 不需要额外维护 shell 别名
- 可以使用
uv tool list、uv tool upgrade、uv tool uninstall做更完整的工具管理 - shell 配置更简洁
2. 验证安装
安装完成后,运行以下命令确认 CLI 正常工作:
specify-zh --help    # 显示命令帮助,且品牌名为 specify-cli-zh
specify-zh version   # 显示版本号和环境信息
specify-zh check     # 检测本机工具链(git、AI agent 等)
[!TIP] 安装包名 vs 执行命令名
用途 名称 pip/uv 安装时使用 specify-cli-zh终端运行时使用 specify-zh
如果你是在已有仓库中接入 Spec Kit,建议优先使用 specify-zh init . 或 specify-zh init --here,这样可以直接在当前目录完成初始化。
3. 建立项目原则
在项目目录中启动你的 AI 助手。初始化完成后,助手中就会提供 Spec Kit 命令。
[!TIP] 对于 Codex CLI,自定义命令使用
/prompts:命名空间。 正确调用方式为/prompts:speckit-constitution、/prompts:speckit-specify等。 不要输入/speckit.constitution或/speckit:constitution,Codex 不支持该格式。
使用 /speckit.constitution 创建项目的治理原则与开发准则;如果你使用 Codex CLI,请输入 /prompts:speckit-constitution。这些原则会贯穿后续所有规范、计划与实现阶段。
# Claude / Gemini / 其他 agent
/speckit.constitution 创建强调代码质量、测试标准、用户体验一致性与性能要求的项目原则

# Codex CLI
/prompts:speckit-constitution 创建强调代码质量、测试标准、用户体验一致性与性能要求的项目原则
3. 创建规格说明
使用 /speckit.specify 描述你要构建什么;Codex CLI 对应命令为 /prompts:speckit-specify。此阶段应重点说明做什么与为什么做,而不是技术栈。
/speckit.specify 构建一个帮助我管理照片相册的应用。相册按日期分组,可在主页拖拽重排;相册之间不允许嵌套;每个相册中的照片以平铺预览方式展示。
4. 创建技术实施计划
使用 /speckit.plan 补充技术栈与架构选择;Codex CLI 对应命令为 /prompts:speckit-plan。
/speckit.plan 应用使用 Vite,并尽量减少外部依赖。优先使用原生 HTML、CSS 与 JavaScript。图片不上传到远端,元数据保存在本地 SQLite 数据库中。
5. 分解任务
使用 /speckit.tasks 将实施计划转成可执行的任务清单;Codex CLI 对应命令为 /prompts:speckit-tasks。
/speckit.tasks
6. 执行实现
使用 /speckit.implement 按计划执行任务并完成功能实现;Codex CLI 对应命令为 /prompts:speckit-implement。
/speckit.implement
如需查看完整分步说明,请阅读 Spec-Driven Development 全流程指南。
7. 常用工作流速查
首次接触时,推荐按 constitution -> specify -> plan -> tasks -> implement 的顺序推进;如果需求仍有模糊点,可以先运行 /speckit.clarify,Codex CLI 则使用 /prompts:speckit-clarify,再进入计划阶段。
📽️ 视频概览
想快速了解 Spec Kit 的工作方式?可以先看这个视频概览:
🚶 社区演练项目
下面这些社区项目展示了规范驱动开发在不同场景中的实际用法:
-
Greenfield .NET CLI tool:从空目录出发,构建一个 .NET 单文件时区工具 CLI,完整覆盖 constitution、specify、plan、tasks 以及多轮 implement 流程。
-
Greenfield Spring Boot + React platform:从零构建一个 LLM 性能分析平台,包含 REST API、图表、迭代跟踪,并演示 clarify 和跨文档一致性分析流程。
-
Brownfield ASP.NET CMS extension:在已有 ASP.NET CMS 项目中追加两个功能,展示 spec-kit 如何适配已有代码库,而不要求项目一开始就有现成规范或 constitution。
🤖 支持的 AI 代理
| 代理 | 支持情况 | 说明 |
|---|---|---|
| Qoder CLI | ✅ | |
| Kiro CLI | ✅ | 使用 --ai kiro-cli,别名为 --ai kiro |
| Amp | ✅ | |
| Auggie CLI | ✅ | |
| Claude Code | ✅ | |
| CodeBuddy CLI | ✅ | |
| Codex CLI | ✅ | |
| Cursor | ✅ | |
| Gemini CLI | ✅ | |
| GitHub Copilot | ✅ | |
| IBM Bob | ✅ | 基于 IDE 的 agent,支持 slash commands |
| Kilo Code | ✅ | |
| opencode | ✅ | |
| Qwen Code | ✅ | |
| Roo Code | ✅ | |
| SHAI (OVHcloud) | ✅ | |
| Tabnine CLI | ✅ | |
| Mistral Vibe | ✅ | |
| Windsurf | ✅ | |
| Antigravity (agy) | ✅ | |
| Generic | ✅ | 自定义代理接入方式。对未内置支持的代理,可通过 --ai generic --ai-commands-dir <path> 注入命令模板 |
[!TIP] 国内主流 AI 编码工具(通义灵码、DeepSeek Coder、百度 Comate、MarsCode 等)均可通过
--ai generic模式接入。 详见 国内大模型接入指南。 如果团队内部有自定义提示模板或命令目录,也可以配合--ai-commands-dir统一接入现有工作流。
🔧 specify-zh 命令参考
specify-zh 命令支持以下能力与参数:
命令
| 命令 | 说明 |
|---|---|
init | 使用最新模板初始化一个新的 Specify 项目 |
version | 显示当前 CLI 版本与运行环境信息 |
check | 检查本机是否安装所需工具(如 git、claude、gemini、cursor-agent、codex、kiro-cli、qodercli、vibe 等) |
codex-sync | 重新同步 Codex prompts,并展示 Codex 中可直接执行的 /prompts:speckit-* 命令 |
specify-zh init 参数与选项
| 参数/选项 | 类型 | 说明 |
|---|---|---|
<project-name> | 参数 | 新项目目录名(使用 --here 时可省略,也可以用 . 表示当前目录) |
--ai | 选项 | 要接入的 AI 助手:claude、gemini、copilot、cursor-agent、qwen、opencode、codex、windsurf、kilocode、auggie、roo、codebuddy、amp、shai、kiro-cli(别名 kiro)、agy、bob、qodercli、tabnine、vibe 或 generic |
--ai-commands-dir | 选项 | 代理命令文件目录(与 --ai generic 配合使用,例如 .myagent/commands/) |
--script | 选项 | 使用脚本类型:sh(bash/zsh)或 ps(PowerShell) |
--ignore-agent-tools | 标志 | 跳过对 Claude Code 等 AI 工具的检查 |
--no-git | 标志 | 跳过 git 仓库初始化 |
--here | 标志 | 直接在当前目录初始化,而不是新建目录 |
--force | 标志 | 当前目录非空时强制合并/覆盖并跳过确认 |
--skip-tls | 标志 | 跳过 SSL/TLS 校验(不推荐) |
--debug | 标志 | 开启详细调试输出,便于排查问题 |
--github-token | 选项 | 用于 GitHub API 请求的令牌(也可通过 GH_TOKEN / GITHUB_TOKEN 环境变量传入) |
--ai-skills | 标志 | 将 Prompt.MD 模板安装到代理专属的 skills/ 目录中(需要配合 --ai) |
示例
# 基础项目初始化
specify-zh init my-project

# 指定 AI 助手初始化
specify-zh init my-project --ai claude

# 使用 Cursor 初始化
specify-zh init my-project --ai cursor-agent

# 使用 Qoder 初始化
specify-zh init my-project --ai qodercli

# 使用 Windsurf 初始化
specify-zh init my-project --ai windsurf

# 使用 Kiro CLI 初始化
specify-zh init my-project --ai kiro-cli

# 使用 Amp 初始化
specify-zh init my-project --ai amp

# 使用 SHAI 初始化
specify-zh init my-project --ai shai

# 使用 Mistral Vibe 初始化
specify-zh init my-project --ai vibe

# 使用 IBM Bob 初始化
specify-zh init my-project --ai bob

# 使用 Antigravity 初始化
specify-zh init my-project --ai agy

# 初始化未内置支持的代理(generic / bring your own agent)
specify-zh init my-project --ai generic --ai-commands-dir .myagent/commands/

# 强制使用 PowerShell 脚本
specify-zh init my-project --ai copilot --script ps

# 在当前目录初始化
specify-zh init . --ai copilot
# 或者使用 --here
specify-zh init --here --ai copilot

# Force merge into current (non-empty) directory without confirmation
specify-zh init . --force --ai copilot
# or
specify-zh init --here --force --ai copilot

# Skip git initialization
specify-zh init my-project --ai gemini --no-git

# Enable debug output for troubleshooting
specify-zh init my-project --ai claude --debug

# Use GitHub token for API requests (helpful for corporate environments)
specify-zh init my-project --ai claude --github-token ghp_your_token_here

# Install agent skills with the project
specify-zh init my-project --ai claude --ai-skills

# Initialize in current directory with agent skills
specify-zh init --here --ai gemini --ai-skills

# Codex + skills 模式
specify-zh init --here --ai codex --ai-skills

# Generic 模式下接入已有命令目录并安装 skills
specify-zh init my-project --ai generic --ai-commands-dir .myagent/commands/ --ai-skills

# Check system requirements
specify-zh check
可用斜杠命令 (Available Slash Commands)
默认情况下,运行 specify-zh init 后,你的 AI 代码代理将获得以下斜杠命令用于结构化开发。
[!IMPORTANT] 如果你使用了
--ai-skills,那么安装结果会变成skills形态,而不是/speckit.*斜杠命令形态。 尤其是 Codex:此时你通常会看到.agents/skills/speckit-*,而不是.codex/prompts/。Codex CLI 的自定义命令运行格式为
/prompts:speckit-constitution(/prompts:+ 文件名),而非/speckit.constitution。
核心命令 (Core Commands)
规范驱动开发流程的必备命令:
推荐顺序:先用 /speckit.constitution 明确治理原则,再逐步进入 /speckit.specify、/speckit.plan、/speckit.tasks 与 /speckit.implement。如果你使用的是 Codex CLI,请把它们分别替换成 /prompts:speckit-constitution、/prompts:speckit-specify、/prompts:speckit-plan、/prompts:speckit-tasks 与 /prompts:speckit-implement。
| 命令 | 描述 |
|---|---|
/speckit.constitution | 创建或更新项目治理原则与开发准则 |
/speckit.specify | 定义你要构建什么(需求与用户故事) |
/speckit.plan | 创建包含所选技术栈的技术实施计划 |
/speckit.tasks | 生成可执行的任务清单 |
/speckit.implement | 执行所有任务,按照计划构建功能 |
可选命令 (Optional Commands)
用于增强质量与验证的附加命令:
| 命令 | 描述 |
|---|---|
/speckit.clarify | 澄清描述不足的地方(建议在 /speckit.plan 前使用;原 /quizme 命令) |
/speckit.analyze | 跨工件一致性与覆盖度分析(在 /speckit.tasks 后、/speckit.implement 前运行) |
/speckit.checklist | 生成自定义质量检查单,验证需求的完整性、清晰度与一致性(类似于"自然语言版的单元测试") |
[!TIP] 上表使用的是通用 slash command 写法。若你在 Codex CLI 中执行,请将
/speckit.<name>换成/prompts:speckit-<name>。
环境变量
| 变量 | 描述 |
|---|---|
SPECIFY_FEATURE | 对于非 Git 仓库,覆盖功能特性分支检测。将其设置为功能特性目录名(例如 001-photo-albums),以便在不使用 Git 分支的情况下开发特定功能。必须在使用 /speckit.plan(Codex CLI 中为 /prompts:speckit-plan)或后续命令之前,在与 Agent 交互的上下文中设置此变量。 |
📚 核心理念 (Core Philosophy)
规范驱动开发 (Spec-Driven Development) 是一个强调以下几点的结构化流程:
- 意图驱动开发:规范优于实现,先定义"做什么"(what),再定义"怎么做"(how)
- 丰富的规范创建:使用护栏 (guardrails) 和组织原则进行约束
- 多步迭代细化:而不是指望通过提示词生成一次性代码
- 高度依赖高级 AI 模型对规范的解读能力
🌟 开发阶段 (Development Phases)
| 阶段 | 关注点 | 关键活动 |
|---|---|---|
| 0 到 1 开发 ("Greenfield") | 从零生成 |
|
| 创造性探索 | 并行实现 |
|
| 迭代增强 ("Brownfield") | 存量系统现代化 |
|
🎯 实验目标 (Experimental Goals)
我们的研究与实验主要集中在以下方面:
技术栈独立
- 使用不同的技术栈创建应用程序
- 验证"规范驱动开发是一种不绑定于特定技术、编程语言或框架的流程"这一假设
企业级约束
- 演示关键业务应用程序的开发
- 结合组织架构约束(云提供商、技术栈、工程实践)
- 支持企业设计系统与合规性要求
以用户为中心的开发
- 为不同的用户群体和偏好构建应用程序
- 支持多种开发方式(从 vibe-coding 到 AI 原生开发)
创新性与迭代流程
- 验证并行实验与对比实施概念的可行性
- 提供稳健的迭代式功能开发工作流
- 扩展流程以处理升级和现代化重构任务
🔧 前置要求
- Linux / macOS / Windows
- 支持的 AI 编码代理
- 用于包管理的 uv
- Python 3.11+
- Git
如果你的网络环境受限,建议提前准备好 GitHub 访问代理或在安装阶段配置镜像源,以减少初始化与升级时的等待成本。
如果在与 Agent 工具的集成中遇到任何问题,请提交 issue,以便我们不断优化集成体验。
📖 了解更多
- 完整的规范驱动开发方法论 - 深入了解整个工作流
- 详细演练流程 - 分步操作指南
- 从旧版本迁移 - 从原版 spec-kit 等的迁移指南
- 升级指南 - 查看版本升级建议与常见变更处理方式
📋 详细流程 (Detailed Process)
点击展开分步详细演练流程
你可以通过 specify-zh 命令使用 specify-cli-zh 工具包来引导你的项目。运行:
specify-zh init <project_name>
或者在当前目录初始化:
specify-zh init .
# 或者使用 --here 标志
specify-zh init --here
# 当目录非空时跳过确认操作
specify-zh init . --force
# 或者
specify-zh init --here --force
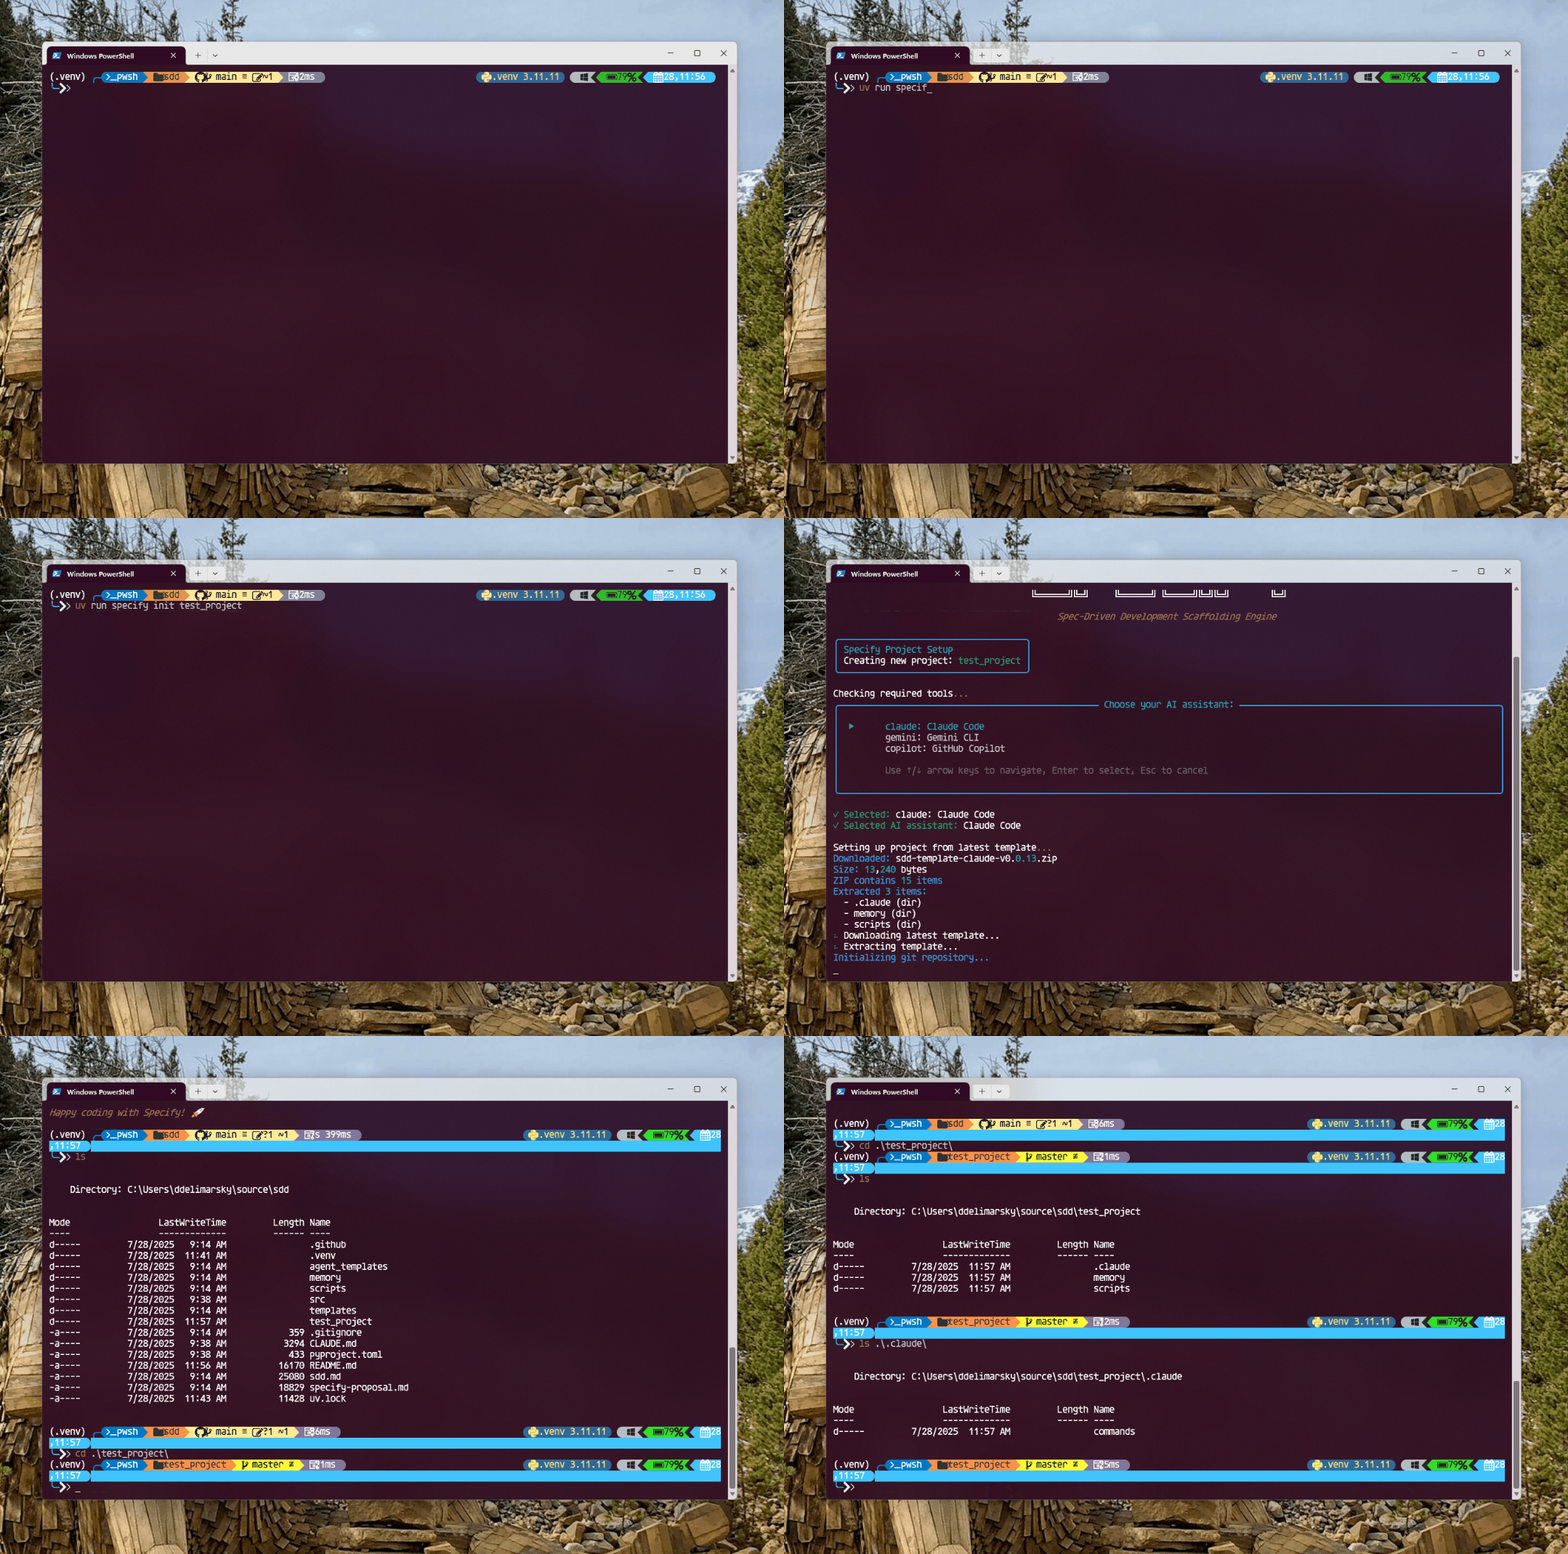
你将被提示选择正在使用的 AI 代理。你也可以在终端直接指定:
specify-zh init <project_name> --ai claude
specify-zh init <project_name> --ai gemini
specify-zh init <project_name> --ai copilot

# 或在当前目录中:
specify-zh init . --ai claude
specify-zh init . --ai codex

# 或使用 --here 标志
specify-zh init --here --ai claude
specify-zh init --here --ai codex

# 强行合并到非空当前目录中
specify-zh init . --force --ai claude

# 或者
specify-zh init --here --force --ai claude
specify-zh 命令将检查你是否安装了对应的 CLI 工具(例如 Claude Code, Gemini CLI, Cursor 等)。如果不具备对应工具,或不想进行工具检测,可以在命令中添加 --ignore-agent-tools 标志强行跳过检查:
specify-zh init <project_name> --ai claude --ignore-agent-tools
第 1 步: 建立项目章程
进入项目文件夹并运行你的 AI 代理程序。在示例中我们使用的是 claude。
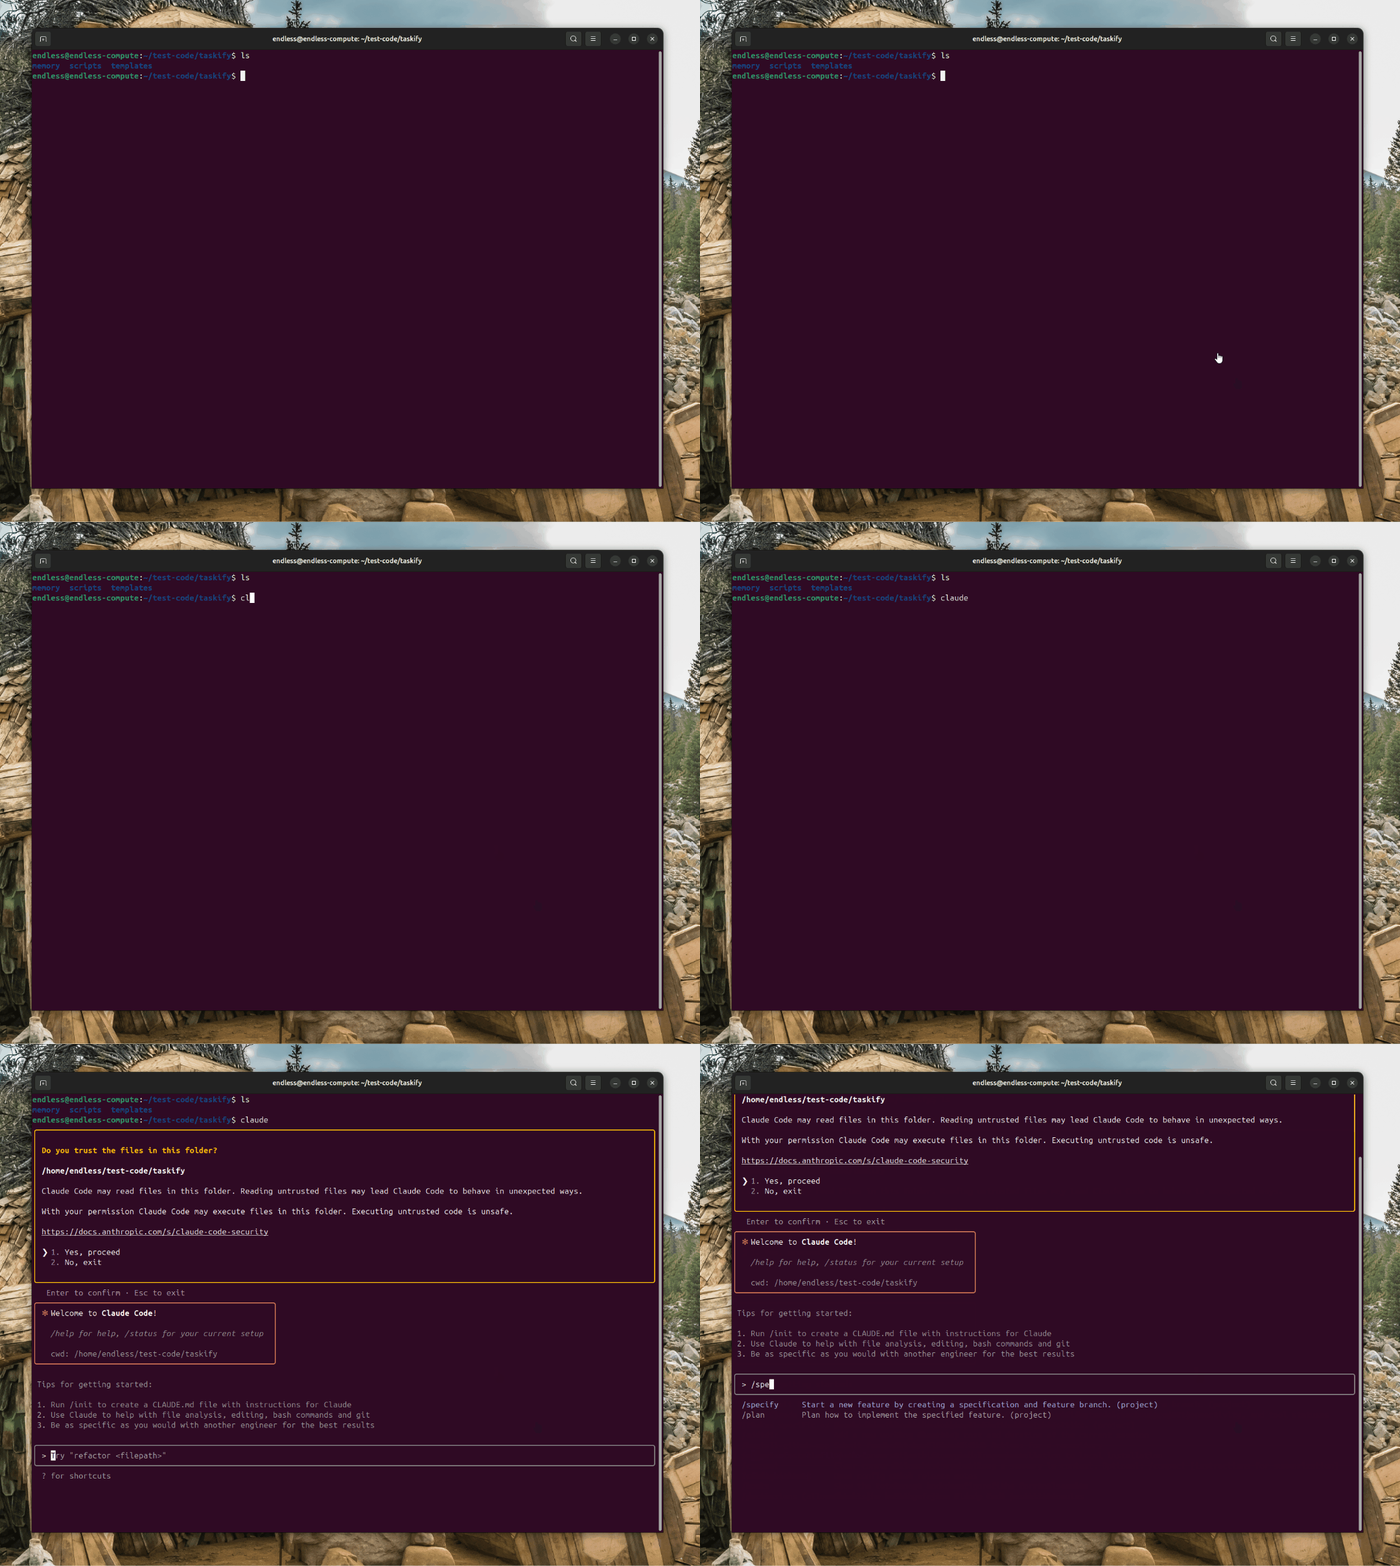
如果看到 Codex CLI 中出现了 /prompts:speckit-constitution, /prompts:speckit-specify, /prompts:speckit-plan, /prompts:speckit-tasks 及 /prompts:speckit-implement 等命令,即代表配置正确。
[!IMPORTANT] Codex CLI 的自定义命令格式为
/prompts:<文件名>,而非/speckit.xxx或/speckit:xxx。 例如~/.codex/prompts/speckit-constitution.md对应命令/prompts:speckit-constitution。
对于 Codex,优先检查全局 prompts 目录是否存在以下文件:
ls -la ~/.codex/prompts/
正常情况下你会看到:
speckit-constitution.md
speckit-specify.md
speckit-plan.md
speckit-tasks.md
speckit-implement.md
specify-zh 现在会在初始化 Codex 项目时同步这些 prompts 到 ~/.codex/prompts/。项目内的 .codex/prompts/ 仅作为兼容副本保留。
如果 Codex 中仍然提示命令不识别,可以在项目目录执行:
specify-zh codex-sync --project .
该命令会重新同步项目内和全局 prompts,并列出 Codex 中应使用的 /prompts:speckit-* 命令。
如果你初始化时用了 --ai-skills,那么对 Codex 来说更应该检查的是:
ls -la .agents/skills/
正常情况下你会看到:
speckit-constitution/
speckit-specify/
speckit-plan/
speckit-tasks/
speckit-implement/
这时不要再使用 /prompts:speckit-constitution。更合适的做法是直接在对话里点名 skill,例如:
使用 speckit-constitution 这个 skill,创建强调代码质量、测试标准、用户体验一致性与性能要求的项目原则。
开发的第一步,是确立该项目的章程 (Constitution)。在 Codex CLI 中使用 /prompts:speckit-constitution,在其他 agent 中使用 /speckit.constitution。这能确保在后续所有阶段技术决策和表现具备一致性。
# Codex CLI
/prompts:speckit-constitution 建立专注于代码质量、测试标准、用户体验一致性及性能要求的项目章程。

# Claude / Gemini / 其他 agent
/speckit.constitution 建立专注于代码质量、测试标准、用户体验一致性及性能要求的项目章程。
此步骤将在 .specify/memory/constitution.md 中为你建立基础章程。AI 代理将在之后的规范定义、实施规划及具体施工阶段中反复参考此文件。
第 2 步: 创建项目规格说明
确立项目原则后,你就可以开始构思功能需求大纲。通用写法是 /speckit.specify;如果你在 Codex CLI 中,请使用 /prompts:speckit-specify。
[!IMPORTANT] 尽可能明确地说明你尝试构建什么以及为什么要构建它。此时不要聚焦于技术栈。
输入提示词的示例:
开发 Taskify,一个团队生产力平台。允许用户建立项目、添加团队成员、分配任务、跨看板评论与拖拽任务(看板模式)。在此特性的初始开发阶段(我们就叫它“创建 Taskify”吧),先预设五名固定用户:一名产品经理和四名工程师。建立三个样本项目。需要包含标准的看板状态列,例如“待办”、“进行中”、“审核中”与“完成”。第一版不用做登录模块。在任务卡片 UI 中,能够更改状态(在不同列中拖拽或切换)。能够为任意卡片留下无限数量的评论并允许分配用户。...
发出此提示后,你将看到 AI 开始进行规范草稿拟定。对于提供该能力的 CLI,它还将执行内置的创建新特性的 shell 脚本,例如自动帮你创建一个 Git 分支。
在此任务完成后,你应该能看到一个新的代码分支被建立(例如 001-create-taskify),并在 specs/001-create-taskify 下拥有了一套完整的需求规范,包括模板定义好的各类用户故事与验收标准。
这时的项目目录结构大致如下:
└── .specify
    ├── memory
    │  └── constitution.md
    ├── scripts
    │  ├── check-prerequisites.sh
    │  ├── common.sh
    │  ├── create-new-feature.sh
    │  ├── setup-plan.sh
    │  └── update-claude-md.sh
    ├── specs
    │  └── 001-create-taskify
    │      └── spec.md
    └── templates
        ├── plan-template.md
        ├── spec-template.md
        └── tasks-template.md
第 3 步: 澄清需求与确认验收单(建议在规划前执行)
当基础规格说明创建好后,你可以开始逐步澄清那些在首次请求中未被精准捕获的需求。
你应在制定实施计划之前运行澄清工作流,以最小化后续可能出现的返工。
推荐的循序渐进法:
- 使用
/speckit.clarify(Codex CLI 中对应/prompts:speckit-clarify)—— 递进式提供覆盖度补全的问题,以理清细节,并将回答记录在“Clarifications”段落中。 - (可选)仍然允许自由对话补充任意细节。
如果你因为原型探路或摸鱼性质的需求而刻意跳过该步骤,也可以显式声明无需澄清。
在完成所有补充细节后,你可以要求 AI 针对本规范生成的Review & Acceptance Checklist (验收检查单) 逐一划勾确认。
提示词示例:
阅读并逐项检查验收标准 checklist。如果当前规范文档已充分满足该检查项的判定要求则打勾。若未满足则保持留空。
将你与 AI 共建的过程视为向它澄清需求、提出反向拷问的机会——切勿将它输出的初稿视作最终定稿。
第 4 步: 生成架构与实施计划
既然你已完成需求梳理,现在就可以具体地探讨技术栈与其它技术要求。使用 /speckit.plan 命令;如果你在 Codex CLI 中,对应命令是 /prompts:speckit-plan。附加你的技术偏好提示语:
我期望使用 .NET Aspire 与 Postgres 数据库搭建这个项目。前端应用 Blazor Server,利用拖拽组件进行任务看板交互,并达成实时渲染更新。建立一套包含对 projects/tasks/notifications 支持的 REST API 后端服务。
这时的输出不仅是一份实施计划,还将伴随一套实现细节档案。这时的文件树形同如下:
.
├── CLAUDE.md
├── memory
│  └── constitution.md
├── scripts
│  ├── check-prerequisites.sh
│  ├── common.sh
│  ├── create-new-feature.sh
│  ├── setup-plan.sh
│  └── update-claude-md.sh
├── specs
│  └── 001-create-taskify
│      ├── contracts
│      │  ├── api-spec.json
│      │  └── signalr-spec.md
│      ├── data-model.md
│      ├── plan.md
│      ├── quickstart.md
│      ├── research.md
│      └── spec.md
└── templates
    ├── CLAUDE-template.md
    ├── plan-template.md
    ├── spec-template.md
    └── tasks-template.md
你可以查阅生成的 research.md 文档,确保它基于你的指令选取了正确的技术栈。如果某些细节看起来不够合适,你可以要求 AI 重新思考,或者干脆提示它读取你本地已安装框架的版本资料库。
此外,对于频繁变动的技术栈(比如最新版 .NET 或者是最新的前端框架),你还可以要求 AI 主动针对计划发起并行的研究搜索。示例提示:
我希望你通读一下 plan.md(实施计划)与各个实现细节文档,找出能够从外部搜索研究中获益的技术细节,因为 .NET Aspire 的库改动往往非常快。找出这些有待深挖的细节任务后,更新研究文档 (research.md),对这版应用即将采纳的精确框架版本进行调研核实。请就此孵化出对应的研究分任务,并发启动研究工作。
在此过程中,你可能会发现 AI 在研究没用的废知识——你可以用以下提示帮其收敛并引导在正确的路上:
我觉得得给你拆成几个步骤。首先,列出行将开发却不甚明朗、需要作进一步调研的子任务清单(比如只写下来需要查什么API)。然后再针对清单内容开启各自独立的研究任务。总而言之,我们只要把每个专门的不确定点各自查清就行了。你刚刚查半天的泛泛而谈全都是些没头苍蝇式的没用信息。调研必须帮你解答针对性极强的开发疑惑,而不是一揽子概述。
[!NOTE] AI 可能会自作多情加一些你想都没想过的新控件。直接怼它并让其对自作主张的更改给出合理解释。
第 5 步: 让 AI 代理验证实施计划
在计划生成后,你要立刻让它自行再通排几遍逻辑,以免存在断层或者实施遗漏项。可以使用如下提示词:
现在去审计一轮前前后后的实施计划跟所有的附属文件资料。仔细阅读以判断那些原本看似不言自明的隐含操作是否其实有断档隐患(因为我无法确信这计划能照章实施)。比方说:如果核心层里写了某某功能,而对应文档里却压根找不到落地的相关条文,这就麻烦了。去审计。
这个动作能极其有效的避免 AI 在自我规划闭环中"盲人摸象"带来的暗病。一旦基础审查打底完毕,记得让它去对应的 checklist 里重行检查确认,随后才能放心进入敲代码阶段。
[!NOTE] 这是防止 AI 产生“过度工程” (Over-engineering) 或瞎扯出一些奇葩重构方案的绝佳防线(别忘了,这帮模型个个都是爱现鬼)。你可以反复强调让它仔细看看
constitution.md(宪章内约定的项目核心原则) 中写明白的纪律条约,并命令它收手。
第 6 步: 使用 /speckit.tasks 生成实现任务清单
一旦技术计划落实经过验证,你可以把整个项目庞大的蓝图揉成一个个明确排序、具体且真正具备可执行落地能力的排期清单。使用 /speckit.tasks;如果你在 Codex CLI 中,对应命令是 /prompts:speckit-tasks:
/speckit.tasks
此步骤会在你的需求专属目录下派生出一份 tasks.md 列出如下内容:
- 基于用户故事拆解的结构 —— 各个用户故事被妥善转变为含有一揽子步骤的实施纪元(phase)。
- 依赖关系管理 —— 将前后置依赖项排序(例如得先起一个数据库 Model 才能再往上糊 Service,等 Service 写完了才配写 Endpoint 接口等)。
- 并行执行标记 —— 用
[P]框出哪些步骤是独立互不干涉的,随时可被并发落地的工作流(方便你大方地撒手放权)。 - 文件路径精确声明 —— 不再允许“AI 随机在各处大小便”而搞出的重复创建乱象,精准将函数落户。
- 预埋敏捷驱动与测试流 (TDD 模式) —— 若先前声明过需有单元测试等约束,那些测试项也将被完美抢排在实现操作的前头。
- 阶段性落体验收 (Checkpoint) —— 定期自我拷打校验独立交付物的正常工作状态。
这份精雕细琢过的 tasks.md 即是一张针对后续 /speckit.implement(Codex CLI 中为 /prompts:speckit-implement)操作发大招使用的详略得当、循序渐进的作战地图。
第 7 步: 冲锋!进入代码实施与构建阶段
一切皆准备就绪时,下达终极出击指令:
/speckit.implement
# Codex CLI:
/prompts:speckit-implement
/speckit.implement 指令将履行以下行动:
- 验证一切前置资料素材库(准则、需求、实施、排期单)到底有无配齐。
- 全盘读取并掌握来自
tasks.md上的详细步骤和流程结构。 - 遵循前置依赖与逻辑关系挨个儿写代码。
- 确保测试先行等 TDD (如果选了此方案的话)策略落地。
- 常规的错误处理自己兜底并持续汇报当前战果。
[!IMPORTANT] Agent 代码终端机必然将会调用底层宿主机系统的各类构建组件(指
dotnet,npm,甚至是包管理那些杂七杂八的东西)——确保你的电脑和它对接的网络等环境没有拦路虎。
当然了,等到代码大功告成的时候,你自己也要去实操体验一通它搭建的应用。对于它自得其乐却忽略了控制台那些(压根没法给终端抛出而只抛在浏览器面板上等)隐性日志引发的页面故障或者其他死角逻辑错漏——只需要把你找的错或者复制下来的报错文儿甩脸给正在等候发落的 Agent 客户端,并督促它完成修补工作就好啦。
🔍 故障排除 (Troubleshooting)
请查阅 常见问题与排障指南 (Troubleshooting Docs) 获取更全面的解决方案,包含:
- 安装包冲突或执行失败策略
- GitHub API 时不时挂掉或限流的配置手段
- 初始化网络超时打结
(参考样例)Linux 上由于 Git 凭据引起报错时的修复脚本
如果你使用的是 Linux 原生环境,它大概率在卡 GitHub 时会触发鉴权弹框问题,这时你大可以上一个 Git Credential Manager 先把事对付明白:
#!/usr/bin/env bash
set -e
echo "Downloading Git Credential Manager v2.6.1..."
wget https://github.com/git-ecosystem/git-credential-manager/releases/download/v2.6.1/gcm-linux_amd64.2.6.1.deb
echo "Installing Git Credential Manager..."
sudo dpkg -i gcm-linux_amd64.2.6.1.deb
echo "Configuring Git to use GCM..."
git config --global credential.helper manager
echo "Cleaning up..."
rm gcm-linux_amd64.2.6.1.deb
📝 README 实践提示
下面整理一些面向新团队和日常协作的实践建议,便于在初始化、规划、实施与排障时快速对齐使用方式。
💬 支持 (Support)
如果需要技术支持、报告错误或是交流有关规范驱动开发的火花思路,请尽情到仓库里提 GitHub Issue。别客气,我们很期待听听大家的声音。
项目优先级见 ROADMAP.md,决策、响应目标与发布方式见 GOVERNANCE.md。提交代码前请阅读 CONTRIBUTING.md;安全问题请按 SECURITY.md 私密报告。
🙏 致谢 (Acknowledgements)
此系统深深致敬、并承接于开源前驱 John Lam 和背后社区团体内那些关于 Agent 上限探索的才华结晶与辛勤耕耘的杰出工作。
📄 许可证 (License)
本项目开源授权基于 MIT 许可证。详阅随附的 LICENSE 全本合约。